Sunday, 8 March 2015

21:55 - No comments

Update a Record in CRM using OData Query | MS CRM


To Update a record in CRM, we require JQuery min 1.4 &  JSON2 script file which we can get from SDK from this specific path

Now add the following code to your web resource.
Also add JSon.js and Jquery1.4min.js to the Library
------------------>

function update()
{
var lookupObject = Xrm.Page.getAttribute("new_lookup").getValue();   //getting the id through lookup
var id = lookupObject[0].id;
var obj = new Object();
obj.new_name = "Hello";
var set="your entity schema nameSet"
updatelog(id,obj,set);

}
function updatelog(id,obj1,odata)
{
var jsonEntity = window.JSON.stringify(obj1);
var serverUrl = window.parent.Xrm.Page.context.getClientUrl();
var ODATA_ENDPOINT = "/XRMServices/2011/OrganizationData.svc";
$.ajax({
                                type: "POST",
                                contentType: "application/json; charset=utf-8",
                                datatype: "json",
                                data: jsonEntity,
                                url: serverUrl + ODATA_ENDPOINT + "/" + odata + "(guid'" + id + "')",
                                beforeSend: function(XMLHttpRequest)
                                {
                                                XMLHttpRequest.setRequestHeader("Accept", "application/json");
                                                XMLHttpRequest.setRequestHeader("X-HTTP-Method", "MERGE");
        }
                                success: function (data, textStatus, XmlHttpRequest) {
                                alert("Updated successfully");
                                },
                                error: function (XmlHttpRequest, textStatus, errorThrown) {
                                if (XmlHttpRequest && XmlHttpRequest.responseText) {
                                alert("Error while updating " + odataSetName+ " ; Error – " + XmlHttpRequest.responseText);
                                }
                                }
                });

}

Friday, 6 March 2015

21:15 - No comments

Creating users in CRM 2015: | MS CRM

Creating users in CRM 2015:

In Microsoft online CRM we can create up to 25 users, where in on-premise CRM we can create n number of users. When we create new CRM there will be one default users that is admin, for creating more users with various privileges. Follow the steps below:
For Online CRM 2015:
Step 1:
 Settings -> Security -> Users and then click new ribbon then it will open a new window for add user.


After that click Add and License Users
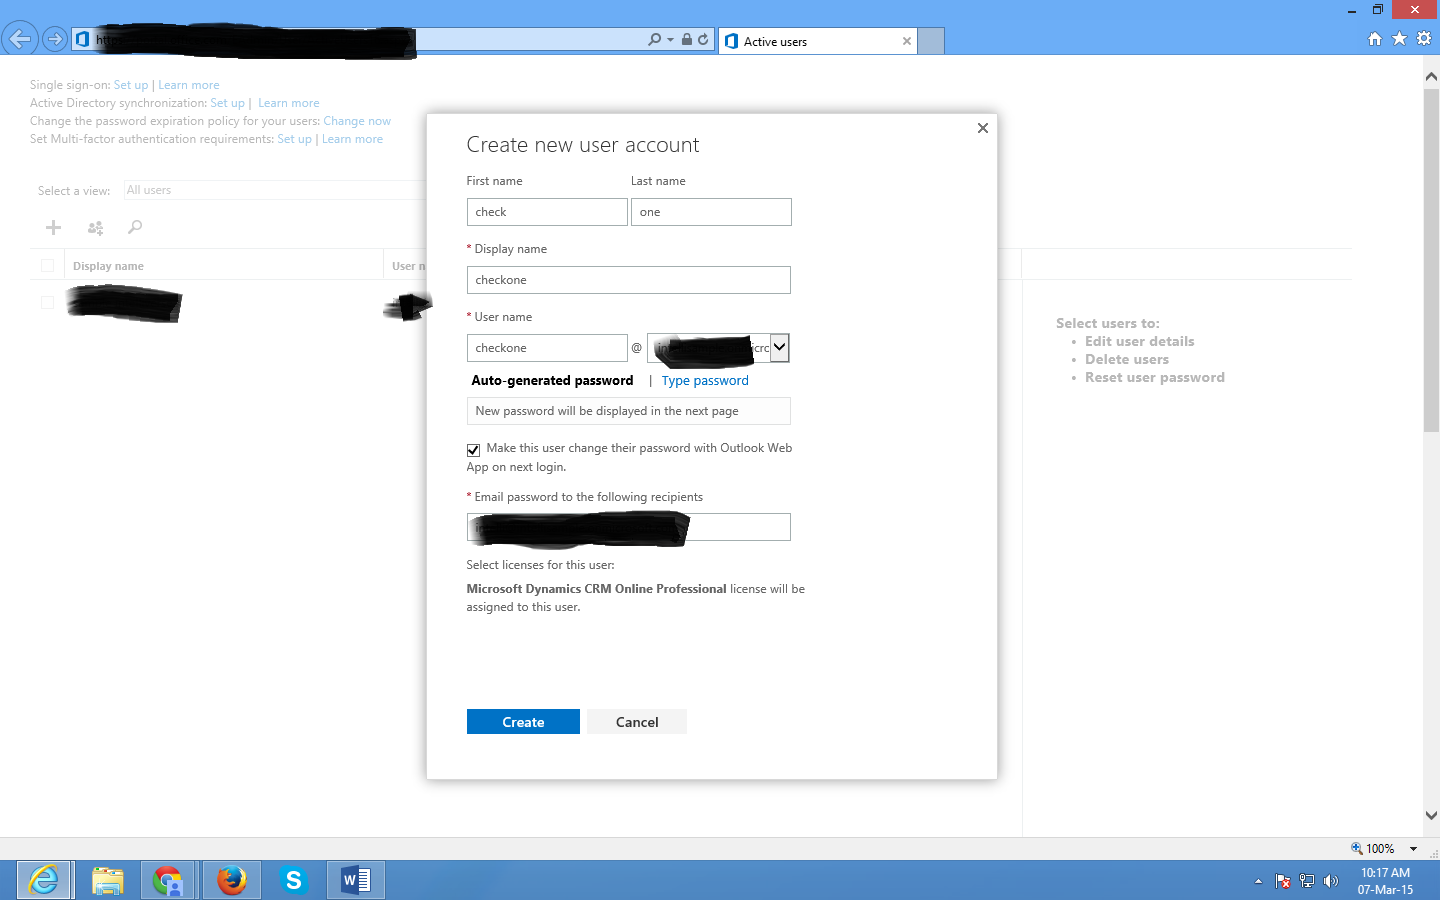
A new tab will  be opened now. In that window click on the “+” button then it will open a dialog box.


Give the necessary details and then click “Create” button.

Now new user has been created.


Thursday, 5 March 2015

22:24 - No comments

CRM 2013 – Client API: Save | MS CRM

Event Arguments

There are a few useful additions that have been added to the client API around the Save event. They are 3 methods that have been formally introduced:
The key method is the getSaveMode function. Think about the new auto-save feature on updated forms. The getSaveMode function allow the JavaScript method executing on the Save event to know why/how the record is being saved. That gives you the flexibility as a developer to add some additional logic to handle your scenario… Below is the list of values returned by the getSaveMode function based on the entity type.


Entity
Event Mode
Value
All
Save
1
All
Save and Close
2
All
Save and New
59
All
AutoSave
70
Activities
Save as Completed
58
All
Deactivate
5
All
Reactivate
6
User or Team owned entities
Assign
47
Email (E-mail)
Send
7
Lead
Qualify
16
Lead
Disqualify
15
This is fantastic as you can now write script to handle very specific scenario like an activity being resolved, a record being saved and closed, assigned and other cases. Below is a usage example in which we prevent the auto-save from happening as presented in the SDK documentation:
Example code:
function preventAutoSave(econtext) {
   var eventArgs = econtext.getEventArgs();
   if (eventArgs.getSaveMode() == 70) {
      eventArgs.preventDefault();
   }

}

21:18 - No comments

Adding a lookup field to select a record and display record details of the same record in the same form by using JavaScript (OData). | MS CRM

Adding a lookup field to select a record and display record details of the same record in the same form by using JavaScript (OData).

Step 1:
Create a lookup field in the form in which the details should be displayed.

Step 2:
Create necessary fields to get and display record details.

Step 3:
Add the JavaScript code given below to the form properties and set the function on change of the lookup field

Eg: Here I am fetching information from lead entity


function getdetail()
{
debugger;
    var lookUpObjectValue = Xrm.Page.getAttribute("lookup field name ").getValue();
    if ((lookUpObjectValue != null))
    {
        var lookuptextvalue = lookUpObjectValue[0].name;
         var lookupid = lookUpObjectValue[0].id;
         var serverUrl = Xrm.Page.context.getClientUrl();
    //The XRM OData end-point
    var ODATA_ENDPOINT = "/XRMServices/2011/OrganizationData.svc";
    var odataSetName = "leadSet"; //which entity looking for (eg: leadSet or contactSet)
    var odataSelect = serverUrl + ODATA_ENDPOINT + "/" + odataSetName + "(guid'" + lookupid + "')";

    $.ajax({
        type: "GET",
        contentType: "application/json; charset=utf-8",
        datatype: "json",
        url: odataSelect,
        beforeSend: function (XMLHttpRequest) { XMLHttpRequest.setRequestHeader("Accept", "application/json"); },
        success: function (data, textStatus, XmlHttpRequest) {

            var result= data.d;
                                //setting the to the current fields
                        Xrm.Page.getAttribute("current field name ").setValue(result.LeadFieldname1);                                             
          Xrm.Page.getAttribute("current field name ").setValue(result.LeadFieldname2)
        },
        error: function (XmlHttpRequest, textStatus, errorThrown) { alert('OData Select Failed: ' + odataSelect); }
    });

    }

   }

20:50 - 11 comments

Create a button inside the form using JavaScript | MS CRM

Create a button inside the form using JavaScript

Description:
 Add a button in the form and between the fields JavaScript functions are handy.

JavaScript Code:
function addButton(attribute_name) {
    if (document.getElementById(attribute_name) != null) {
        var FieldID = "field" + attribute_name;
        var elementID = document.getElementById(attribute_name + "_d");
        var div = document.createElement("div");
        div.style.width = "20%";
        div.style.textAlign = "right";
        div.style.display = "inline";
        elementID.appendChild(div, elementID);
        div.innerHTML = '<button id="' + FieldID + '" type="button" style="margin-left: 4px; width: 50%; " >Add Me</button>';
        document.getElementById(attribute_name).style.width = "80%";
        document.getElementById(FieldID).onclick = function () {onbuttonclick(); };
    }
}

function onbuttonclick() {
var sam= Xrm.Page.getAttribute("new_name").getValue();
    alert('welcome to'+sam);
}
           

Placing a Button:
            After Adding JavaScript function to the form property the position of the button to be configured by add the field name under which button should display in Handler property -> parameters (as in figure  below)


Output:
Then the output will be like this


04:01 - No comments

CRM 2013 Useful JScripts | MS CRM

Get the value from a CRM field
var value = Xrm.Page.getAttribute(“CRMFieldSchemaName”).getValue();

Set the value of a CRM field
Xrm.Page.getAttribute(“CRMFieldSchemaName “).setValue(“New Value”);

Get the value from a CRM OptionSet field
var value = Xrm.Page.getAttribute(“CRMOptionSetSchemaName”).getValue();

Get the text from a CRM OptionSet field
var text = Xrm.Page.getAttribute(“CRMOptionSetSchemaName”).getText();

Set the value of a CRM OptionSet field
Xrm.Page.getAttribute(“CRMOptionSetSchemaName”).setValue(“1″); // OptionSet Value

Get the selected text of a CRM OptionSet field
Xrm.Page.getAttribute(“CRMOptionSetSchemaName”).getSelectedOption().text;

Get the selected value of a CRM OptionSet field
Xrm.Page.getAttribute(“CRMOptionSetSchemaName”).getSelectedOption().value;

Get the text and value of a CRM Lookup field
var lookupObject = Xrm.Page.getAttribute(“CRMLookupSchemaName”).getValue();
lookupObject[0].name; // text of lookup
lookupObject[0].id; // Guid of lookup

Set the value of a CRM Lookup field
var lookupData = new Array();
var lookupItem = new Object();
lookupItem.id = “4A2A54CB-349C-E111-8D26-1CC1DEE8DA78″; // Guid of record
lookupItem.name = “New Contact”; // Entity record name
lookupItem.entityType = “EntitySchemaName”;
lookupData[0] = lookupItem;
Xrm.Page.getAttribute(“CRMLookupSchemaName”).setValue(lookupData);

Disable CRM field
Xrm.Page.ui.controls.get(“CRMFieldSchemaName”).setDisabled(true);

Hide CRM field
Xrm.Page.ui.controls.get(“CRMFieldSchemaName”).setVisible(false);

Hide a Tab in CRM
Xrm.Page.ui.tabs.get(“tabName”).setVisible(false);

Hide a Section in CRM
var tab = Xrm.Page.ui.tabs.get(“tabName”);
tab.sections.get(“sectionName”).setVisible(false);

Set the Requirement level in CRM
Xrm.Page.getAttribute(“CRMFieldSchemaName”).setRequiredLevel(“required”);
Xrm.Page.getAttribute(“CRMFieldSchemaName”).setRequiredLevel(“none”);
Xrm.Page.getAttribute(“CRMFieldSchemaName”).setRequiredLevel(“recommended”);

Set Focus on a field in CRM
Xrm.Page.ui.controls.get(“CRMFieldSchemaName”).setFocus(true);

Cancelling Onsave Event in CRM
event.returnValue = false;
return false;

Check IsDirty in CRM field
var isDirty = Xrm.Page.getAttribute(“CRMFieldSchemaName”).getIsDirty();
alert(isDirty); // returns true if the field is dirty

Check IsDirty for all the fields in CRM
var isDirty = Xrm.Page.data.entity.getIsDirty();
alert(isDirty); // returns true if any of the field is dirty in the entire form.

Force Submit a read only field in CRM
Xrm.Page.getAttribute(“CRMFieldSchemaName”).setSubmitMode(“always”);

Preventing an attribute to be saved in CRM form
Xrm.Page.getAttribute(“CRMFieldSchemaName”).setSubmitMode(“never”);

Get Unique Organization Name in CRM
Xrm.Page.context.getOrgUniqueName();

Get Server url in CRM
Xrm.Page.context.getServerUrl();

Get the record Id in CRM
Xrm.Page.data.entity.getId();

Get the User Id in CRM
Xrm.Page.context.getUserId();

Get the Entity Schema Name in CRM
Xrm.Page.data.entity.getEntityName();

Get the UserRole Id’s in CRM
var userRoles = Xrm.Page.context.getUserRoles();
for (var i = 0; i < userRoles.length; i++)
{
var userRole = userRoles[i]; // returns the Role Id
}

Get the Form Type in CRM
Xrm.Page.ui.getFormType();

Form Types in CRM
Is the user creating a new record?
Xrm.Page.ui.getFormType() == “1”

Is the user updating an existing record?
Xrm.Page.ui.getFormType() == “2”

Is the user unable to update this record?
Xrm.Page.ui.getFormType() == “3”

Is this record deactivated?
Xrm.Page.ui.getFormType() == “4”

Is the user using the Quick Create form?
Xrm.Page.ui.getFormType() == “5”

Is the user using the Bulk Edit form?
Xrm.Page.ui.getFormType() == “6”

Save a record in CRM
Xrm.Page.data.entity.save(); // for saving a record
Xrm.Page.data.entity.save(“saveandclose”); // for save and close
Xrm.Page.data.entity.save(“saveandnew”); // for save and new

Close the form in CRM
Xrm.Page.ui.close();

03:34 - No comments

How to Create a Simple Webpage Leveraging The CRM 2013 IOrganizationService Web Service | MS CRM

Create a  Custom Web Site
Step by Step

1.      Create a new Web Site:

a.           Open Visual Studio 2010 to create a new web site
b.       Click File | New | Web Site
c.        Under Installed Templates, click Visual C# and choose ASP .NET Empty Web Site. Name the
           project "CRMContactDataEntry". Click OK.
d.       Click Website|Add New Item. This is the actual aspx page that we will develop on.
e.       Under Installed Templates, click Visual C# and choose Web Form. Click OK.
2.       Add a Title and Field Names to the Default.aspx page.
a.      Within Solution Explorer right click on the Default.aspx page and choose View Designer.


b.          Click in the box on the Default.aspx page and type the text “CONTACT ENTRY FORM” to give the page a title.

            
c.           Hit the Enter Key to create a new line below the title and type the text “First Name“.
d.       Add three more lines with the text “Last Name “, “Email Address ”, and “Phone Number ”.


3.       Add four Textbox’s and a Button to the aspx page.
                a.       Click View|Toolbox. When the toolbox window opens click the pin icon to keep the window open.

                
b.       Find the TextBox control within the Toolbox window. Drag the TextBox control onto the Default.aspx page behind the text “First Name”. This creates a single Textbox on the page.

             
c.        Right click the TextBox control on the default.aspx page and choose Properties. The properties window will display on your right hand side.

             
d.       Find the ID property and change the value to txtFirstName.


e.       Repeat steps b-d to create three more TextBox’s with the following names.
·   txtLastName
·   txtEmailAddress
·   txtPhoneNumber
f.         Find the Button control within the Toolbox window. Drag the Button control onto the Default.aspx page Under the text “Phone Number”. This creates a single Button on the page.


g.       Right click the Button control on the default.aspx page and choose Properties. The properties window will display on your right hand side.

     
h.       Find the Text property and change the value to Submit.


4.       Add code to the Button’s Click Event.
a.       Double-Click the Button control on the Default.aspx page. This will take you to the Default.aspx.cs file where we can see the Button1_Click method.

b.        Add the following code within the Button1_Click code method.
NOTE: You will need to update the Organization URL to match your CRM Servername and OrgName. (i.e. “http://crmsrv:5555/org1/XRMServices/2011/Organization.svc”)
protected void Button1_Click(object sender, EventArgs e)
    {
        //Authenticate using credentials of the logged in user;       
        ClientCredentials Credentials = new ClientCredentials();
        Credentials.Windows.ClientCredential = CredentialCache.DefaultNetworkCredentials;
        //This URL needs to be updated to match the servername and Organization for the environment.
        Uri OrganizationUri = newUri("http://<SERVERURL>/<ORGNAME>/XRMServices/2011/Organization.svc");
        Uri HomeRealmUri = null;

        //OrganizationServiceProxy serviceProxy;       
        using (OrganizationServiceProxy serviceProxy = new OrganizationServiceProxy(OrganizationUri, HomeRealmUri, Credentials, null))
        {
            IOrganizationService service = (IOrganizationService)serviceProxy;

            //Instantiate the contact object and populate the attributes.
            Entity contact = new Entity("contact");
            contact["firstname"] = txtFirstName.Text.ToString();
            contact["lastname"] = txtLastName.Text.ToString();
            contact["emailaddress1"] = txtEmailAddress.Text.ToString();
            contact["telephone1"] = txtPhoneNumber.Text.ToString();
            Guid newContactId = service.Create(contact);
           
            //This code will clear the textboxes after the contact is created.
            txtFirstName.Text = "";
            txtLastName.Text = "";
            txtEmailAddress.Text = "";
            txtPhoneNumber.Text = "";
        }
    } 
5. Add the Microsoft.Xrm.Sdk and Microsoft.crm.sdk.proxy assemblies as references
a.  Locate the Solution Explorer, right-click the ProjectName and choose Add Reference
        
b.       In the Add Reference browser window, click the Browse tab and browse to the location of this assembly reference (this is located in the Bin directory of the downloaded SDK)
c. Choose Microsoft.Xrm.Sdk and Microsoft.crm.sdk.proxy, click OK.
             
d.  Add the following using statements at the top of the Default.aspx.cs file.
using System.ServiceModel.Description;
using Microsoft.Xrm.Sdk.Client;
using System.Net;
using Microsoft.Xrm.Sdk;
e. The completed code should look similar to the following.
using System;
using System.Collections.Generic;
using System.Linq;
using System.Web;
using System.Web.UI;
using System.Web.UI.WebControls;
using System.ServiceModel.Description;
using Microsoft.Xrm.Sdk.Client;
using System.Net;
using Microsoft.Xrm.Sdk;

public partial class _Default : System.Web.UI.Page
{
    protected void Page_Load(object sender, EventArgs e)
    {

    }
    protected void Button1_Click(object sender, EventArgs e)
    {
        ClientCredentials Credentials = new ClientCredentials();
        Credentials.Windows.ClientCredential = CredentialCache.DefaultNetworkCredentials;
        //This URL needs to be updated to match the servername and Organization for the environment.
        Uri OrganizationUri = newUri("http://<ServerName>/<Orgname>/XRMServices/2011/Organization.svc");
        Uri HomeRealmUri = null;

        //OrganizationServiceProxy serviceProxy;       
        using (OrganizationServiceProxy serviceProxy = new OrganizationServiceProxy(OrganizationUri, HomeRealmUri, Credentials, null))
        {
            IOrganizationService service = (IOrganizationService)serviceProxy;

            //Instantiate the contact object and populate the attributes.
            Entity contact = new Entity("contact");
            contact["firstname"] = txtFirstName.Text.ToString();
            contact["lastname"] = txtLastName.Text.ToString();
            contact["emailaddress1"] = txtEmailAddress.Text.ToString();
            contact["telephone1"] = txtPhoneNumber.Text.ToString();
            Guid newContactId = service.Create(contact);
           
            //This code will clear the textboxes after the contact is created.
            txtFirstName.Text = "";
            txtLastName.Text = "";
            txtEmailAddress.Text = "";
            txtPhoneNumber.Text = "";
        }
    }
}

6.    Compile and Run the Custom Page.
a.       Click Build|Build Solution. If everything is correct you will see it say Build Succeeded at the bottom of the Visual Studio Window.

       
b.       Click Debug|Start Debugging. This will launch the website locally within Internet Explorer and allow for testing
c. Enter information into each of the text boxes and then click the Submit button. The textboxes will automatically clear out once the contact has been created.
Note: The user will need to be a CRM user for the contact to be created.


d. Open the CRM Web Client to see the newly created Contact Record.